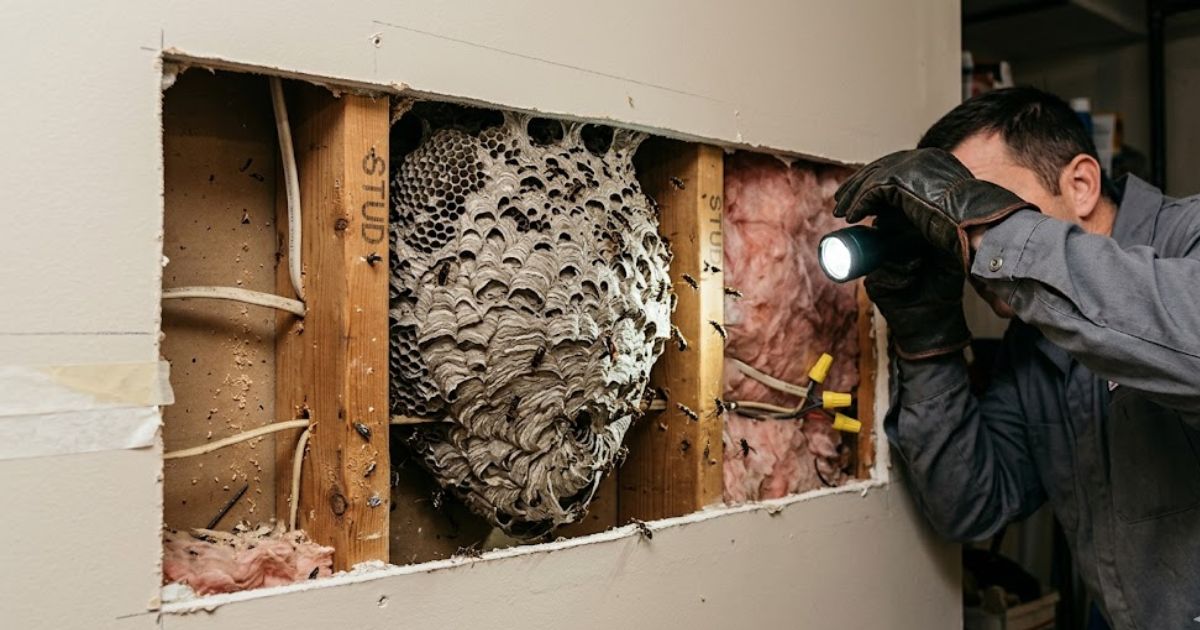
Wasps chew old wood from fences and dead trees. They mix it with saliva to form wood pulp. Worker wasps press this pulp into thin sheets inside your wall cavity. Each layer builds the growing paper nest structure from scratch.
The queen wasp lays eggs inside small cell chambers of the nest comb. The social wasp colony doubles in size every few weeks. We’ve seen Toronto wasp nests fill an entire wall section fast. That tight structure traps heat and hides the colony deep inside.
Which Wasp Species Commonly Nest in Walls?
| Species | Nest Behavior | Aggression Level | Common Entry Points |
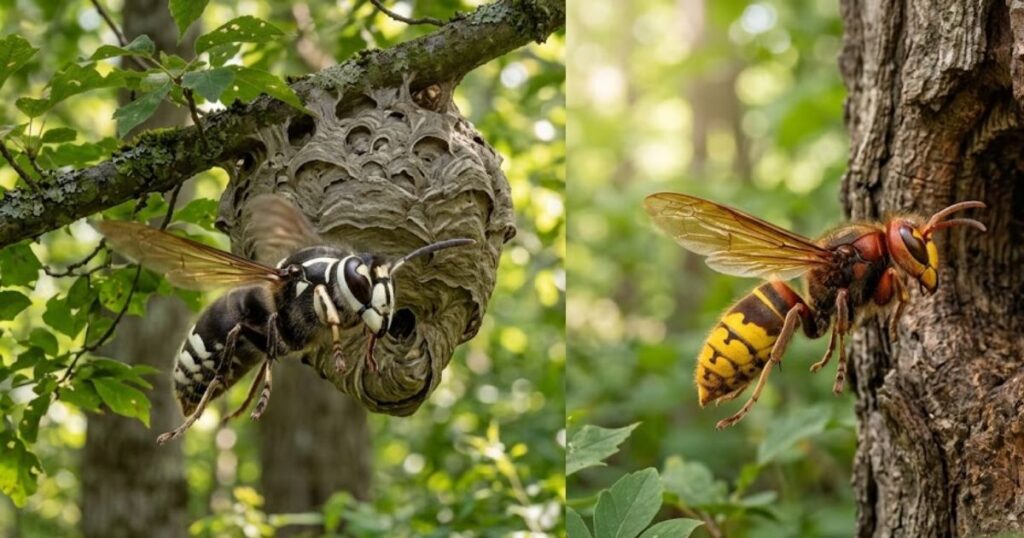
| Yellowjackets | Large colonies | High | Siding gaps |
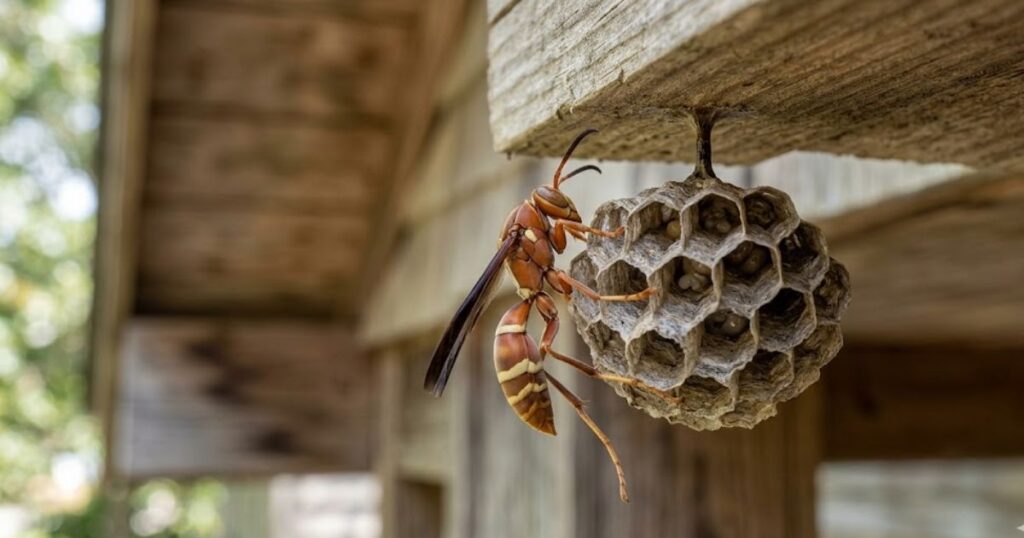
| Paper Wasps | Smaller comb nests | Moderate | Soffits |
| European Hornets | Large cavities | Moderate | Attic vents |
What Are the Signs of a Wasp Nest in Your Wall?
A faint buzzing sound inside your wall is a clear red flag. Wasp activity near exterior wall gaps means they already found a way in. Look for a small entry hole where worker wasps move in and out. A soft nest vibration felt through the drywall confirms the colony is active.
Older Toronto homes trap heat easily, making heat signatures visible on interior walls. Sound resonance in drywall grows louder as the colony expands deeper inside. Spotting indoor wasp sightings near baseboards or vents points directly to a wall cavity nest close by. We’ve seen this exact pattern in many Toronto homes during our on site checks.
Where Do Wasps Enter Wall Cavities?
Structural Entry Points
Siding cracks along a loose siding seam open up fast over time. Check the soffit, fascia board, and roofline gap on your next walk around. A torn attic vent screen creates a direct entry point almost overnight. Soffit ventilation gaps on Toronto’s older exterior structure are a very common weak spot.
Small Gaps Enable Infestation
Yellowjackets squeeze through a 6mm entry gap near cable penetrations quite easily. Their insect body width matches utility openings and window trim gaps almost perfectly. Once through, cavity access fills the wall void with a fast growing colony. We always check soffit vents near vinyl siding overlaps and fascia gaps first.
What Risks Do Wall Nest Infestations Create?
Sting Risk and Human Health
Wasps defend nests aggressively the moment they sense any danger. A wasp sting releases venom and triggers an allergic reaction quickly. Multiple stings increase allergic risk and can lead to anaphylaxis fast. CDC data links sting toxicity to 60 deaths yearly in North America.
Structural Risks
Nest moisture stains drywall and softens the surface from inside out. That dampness spreads into insulation and weakens wood framing badly. Structural damage grows quietly behind walls for months without any sign. Take a Toronto home from the 1980s. Moisture damage there often hides for years.
Secondary Pest Risks
An old empty nest draws a fresh pest infestation surprisingly fast. Carpet beetles and dermestid beetles feed on leftover nest material right away. Parasitic insects move in next and spread deeper into your walls. Dead nest remnants become a food source that keeps new pests coming.
How Do Professionals Confirm a Wasp Nest in Your Wall?
Track the flight path of wasps near your siding first. Entry observation near eave lines gives the first real clue fast. Press your hand gently to feel wall vibrations from inside. A proper wall inspection at this stage saves a lot of guesswork.
We use an inspection camera to peek inside tight wall spaces directly. Thermal cameras spot heat from an active colony through the surface. Acoustic sensors pick up wall vibrations missed by the human ear. A borescope gives full visual nest confirmation without cutting open your wall.
DIY Treatment Options for Wasp Nests in Wall Cavities
Insecticidal Dust Treatment
Insecticide dust travels deep into wall gaps where sprays simply can’t reach. Carbaryl dust and deltamethrin coat the nest surface and kill wasps on contact. Dust sticks to their bodies and spreads through the whole colony fast. Silica aerogel works differently by damaging the wasp’s outer shell slowly.
Foam Insecticide for Wall Voids
Foam insecticide expands inside the void and blocks all exit paths quickly. It fills irregular shapes that dust sometimes misses near tight corners. This nest treatment method works best after dust application in deeper wall sections. Combining both gives much better results than using just one alone.
Night Treatment Protocol
Treat at night when all wasps return to the nest for rest. Wasps move slowly in the dark and defend far less aggressively then. Puff insecticide dust into the entry point and seal it loosely after. Repeat the treatment after 48 hours to catch any survivors still inside.
Why Blocking the Entry Hole Too Early Causes Bigger Problems
Blocked exits force wasps indoors and that turns a wall problem into a home problem. Entry hole sealing before treatment traps the whole colony with nowhere to go. Trapped wasps panic fast and start looking for any new exit point. Most Toronto homeowners don’t realize this until wasps appear inside their rooms.
Trapped colonies chew drywall from the inside to force a brand new exit. That interior wall breakout causes far more damage than the original nest ever did. Always treat the colony fully before any entry hole sealing takes place. We’ve seen sealed walls split open in Toronto homes simply because the colony fought its way out.
How Professionals Remove Wasp Nests from Wall Cavities
Wall Void Access Methods
A pest control technician starts by locating the nest zone precisely first. Siding removal gives direct access without guessing or cutting drywall unnecessarily. An inspection scope confirms the nest position before any treatment begins. Wall void treatment only starts after full access gets confirmed on site.
Nest Extraction Process
A void injector delivers treatment deep where a regular can never reaches. The dust applicator pushes product through the cavity using extension dust injectors evenly. Wall void foam guns seal treated sections and stop wasps from shifting deeper inside. Full nest extraction wraps up only after the technician confirms zero live activity remains.
How to Prevent Wasps from Nesting in Walls
Structural Exclusion Methods
Structural sealing stops wasps before they ever find a way inside. Apply caulk along every gap near window frames and siding edges carefully. Mesh screens over vents block entry without cutting off airflow at all. This basic pest exclusion step protects Toronto homes all spring and summer long.
Habitat Reduction
Habitat reduction removes the conditions that attract wasps to your property first. Clear rotting wood, dense shrubs, and old debris from around your home. Wasps scout for sheltered spots near walls before they ever start building. Fewer hiding spots near your exterior mean far fewer nesting attempts overall.
Early Season Inspection Strategy
A seasonal inspection every April catches wasp scouts before any nest forms. Walk your full exterior and check every soffit line and gap closely. Early season pest prevention costs far less than a full summer removal job. We recommend a quick yearly inspection as the single smartest move Toronto homeowners can make.
Seasonal Lifecycle of Wall Nesting Wasps
| Season | Colony Stage | Activity Level |
| Spring | Queen establishes nest | Low |
| Early Summer | Worker population expands | Moderate |
| Late Summer | Colony peaks | High |
| Fall | Colony collapses | Declining |
Integrated Pest Management Strategy for Long Term Control
Integrated Pest Management (IPM) tackles wall nest problems at every stage systematically. Regular monitoring of your exterior catches wasp activity before it grows serious. Inspection each season gives you a clear picture of what changed since last year. This approach beats random pesticide control because it targets the actual source directly.
Exclusion blocks future nesting spots after every targeted treatment gets completed. IPM connects prevention, detection, and treatment into one reliable long term plan. Toronto homes with older siding benefit most from this layered protection strategy. Each step builds on the last so wasps never get a second chance inside.
Why Choose Pestiseed Wasp Nest Removal
Pestiseed brings fully certified technicians to every wasp job across Toronto. Our pest control service covers the entire local service area with fast response times. Same day and emergency response calls get handled without any extra delay. Every visit follows a clear plan built around safe treatment for your family first.
Professional wasp nest extermination at Pestiseed means the job gets done right the first time. Our certifications meet Ontario’s pest control standards across every service category. Guaranteed removal backs every wall nest treatment we complete on your property. You get real results, not just a spray and a handshake at the door.
Frequently Asked Questions About Wasp Nests in Walls
How to Get Rid of a Wasp Nest in a Wall Cavity?
Apply insecticidal dust like deltamethrin dust directly into the entry hole at night. Worker wasps carry the dust deep inside and spread it colony wide. Foam insecticide blocks exist after treatment for full colony elimination.
Will a Wasp Nest Disappear During Winter?
Worker wasps die off when Toronto temperatures drop in late fall. The queen wasp hibernates alone and builds a completely fresh nest next spring. Old nests never get reused by a new wasp colony.
Can Wasps Chew Through Drywall?
Yes. Trapped wasps chew through drywall when their entry hole gets sealed too early. A blocked wall cavity forces the whole colony to find a brand new exit fast.
Do Wall Nests Damage Insulation?
Nest expansion compresses fiberglass insulation and reduces its ability to hold heat. Dead insects contaminate cellulose insulation and create bad odors inside walls. Moisture buildup from the nest also causes visible wall stains over time.
How Much Does Professional Removal Cost?
Wasp nest removal cost depends on nest location, colony size, and wall access difficulty. Jobs needing thermal inspection, wall drilling, or siding removal cost more than standard treatments. Contact Pestiseed for a free on site assessment across Toronto today.
Home Inspection Checklist for Wasp Entry Points
A quick home inspection every spring catches pest entry points before wasps move in. Walk your full exterior and follow these steps to stay ahead of nesting season.
- Inspect siding gaps along every panel edge and overlap carefully
- Check soffit vents for torn screens or loose covers near rooflines
- Seal all utility openings around cables, pipes, and meter boxes tightly
- Install vent screens over any open attic or crawl space vents now
Structural gaps near window trim and fascia boards hide in plain sight. Most Toronto homeowners miss these spots during a casual walk around outside. Pestiseed Pest Control offers a professional entry point assessment for full peace of mind. Catching these pest entry points early saves a lot of trouble come summer.
