Wasp nest removal becomes a serious health concern every summer in Toronto. Aggressive wasps defend their homes with multiple painful stings. A single wasp sting can cause severe allergic reactions. Some people need emergency hospital visits after wasp attacks. We see this happen too often during peak wasp season.Our professional wasp nest services ensure quick and effective elimination, so you don’t have to worry about how to get rid of wasps yourself.
If you’re wondering how to get rid of wasps effectively, our licensed experts provide safe, professional removal services for every situation.Health risks increase dramatically from June through September in Toronto. Seasonal aggression patterns show wasps become most dangerous in late summer. They protect their growing colonies with fierce determination. Legal considerations also matter because improper removal can harm neighbors. Our licensed experts understand Toronto’s pest control bylaws perfectly. We provide safe solutions that protect your family and community.
As specialists in wasp nest removal Toronto, we ensure quick and safe removal, protecting your home from potential harm. Fast service means we handle dangerous nests before someone gets hurt. Our local trusted team offers same day availability for emergencies. With 5+ years experience in Toronto wasp removal, we know exactly what works. 24/7 service ensures help arrives when you need it most. Transparent and budget-friendly service with no surprises. Guaranteed enjoy 10% off all pest control services trusted when you choose professional help over dangerous DIY attempts.
Identifying Your Wasp Nest Type Before Removal
Knowing your enemy makes safe solutions possible for Toronto homeowners. Different wasp species build different types of nests. Each type needs a different removal approach. Our licensed experts see three main types around Toronto homes. Fast service starts with correct identification every time.
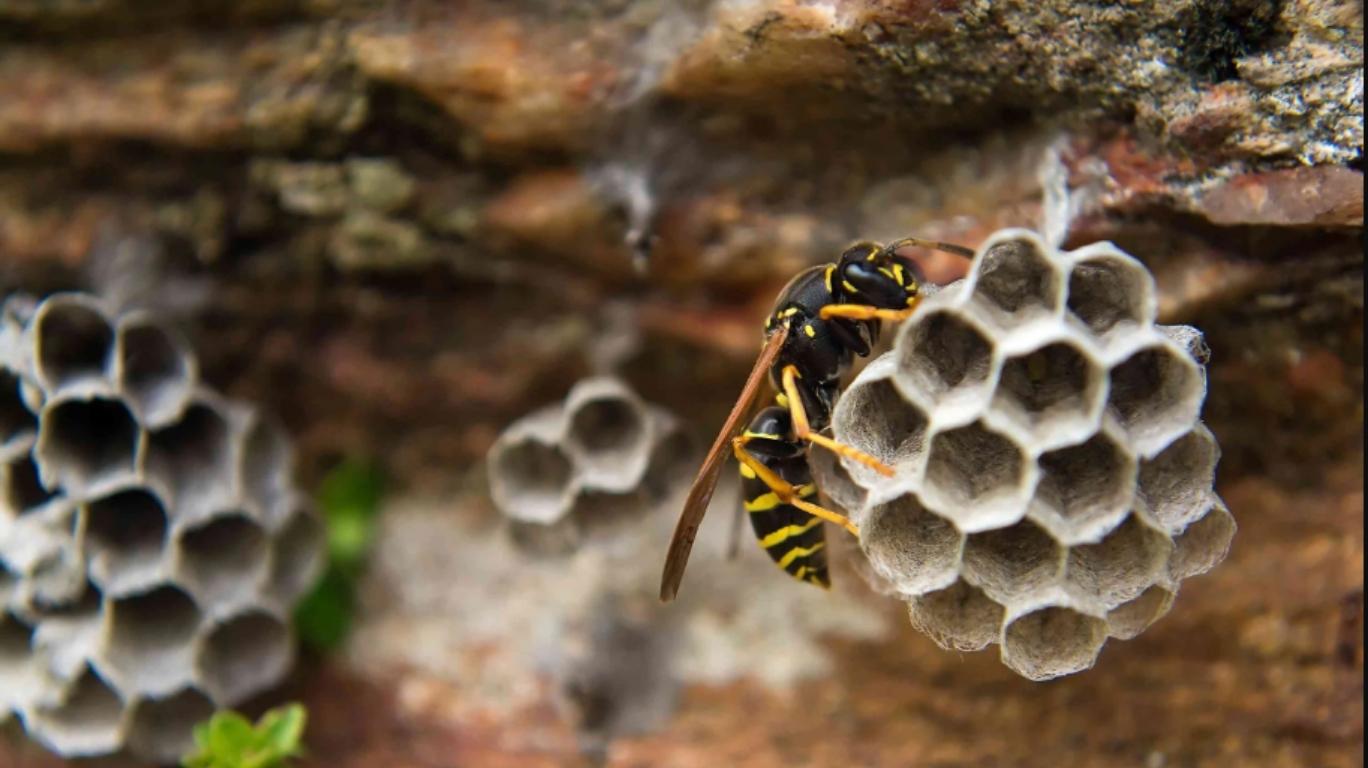
Paper Wasp Nest Identification
Paper wasp nests look like gray upside down umbrellas. You can see all the honeycomb cells clearly. These nests hang from porch ceilings and window frames. Paper wasp colonies stay small with fewer than 100 wasps. The queen builds her nest in protected spots. Spring nests start tiny but grow through summer. Our local trusted team removes these nests same day availability. Professional removal of small paper wasp nests.
Yellowjacket Ground and Wall Nests
Yellowjacket nests hide in walls, ground holes, and attics. You only see a small entrance hole usually. These nests look like gray paper balls inside. Yellowjacket colonies can hold thousands of angry wasps. Ground nests often use old mouse holes. Wall nests squeeze into tight spaces between boards. These wasps get very mad when disturbed. Our 5+ years experience helps us find hidden yellowjacket nests. 24/7 service means we handle emergencies fast.
Bald Faced Hornet Aerial Nests
Hornet nest removal requires extreme caution in Toronto. These nests look like giant gray footballs. They hang high in trees or building sides. Bald faced hornets are actually large yellowjackets. Their nests can reach two feet tall. One entrance sits at the bottom usually. These wasps attack in groups when threatened. Hornet nest removal needs professional equipment always. Affordable rates no hidden fees cover all safety gear. Guaranteed enjoy 10% off all pest control services trusted for hornet jobs.
DIY vs Professional Wasp Removal Decision Guide
Making the wrong choice about wasp removal can put your family at serious risk. DIY attempts often turn dangerous very quickly in Toronto homes. Professional pest control experts handle these situations every single day safely. We see too many homeowners get stung trying to save money. Pest control expert teams have the right gear and training. The choice between doing it yourself or calling pros matters a lot.
When DIY Removal is Safe
Small paper wasp nests under your deck might be manageable alone. The nest must be smaller than a tennis ball size. You need full protective gear from head to toe completely. Wasp activity should be very low during early morning hours. The nest location must be easy to reach without ladders. Spring timing works best when colonies are still tiny. Safe solutions require proper wasp spray with long-range capability. Never attempt DIY on yellowjacket or hornet nests ever. One wrong move can trigger a dangerous swarm attack. Even small nests can house hundreds of angry wasps.
When to Call Toronto Professionals
Licensed experts handle wasp removal jobs that homeowners cannot risk. Fast service protects your family from continued wasp threats daily. Any nest larger than a golf ball needs professional attention immediately. Wall cavities and attic wasp nests require specialized equipment always. Local trusted pest control companies know Toronto wasp patterns well. Our 5+ years experience shows us which wasp species are most aggressive. Same day availability means no waiting while wasps multiply rapidly. 24/7 service covers emergency situations when wasps attack unexpectedly. Basic professional wasp removal services available.. Affordable rates no hidden fees make professional help accessible to everyone. Guaranteed enjoy 10% off all pest control services trusted when you book today.
Essential Safety Equipment for Wasp Nest Removal
PPE requirements are not optional when dealing with wasps. You need full body protection before you start. Heavy gloves protect your hands from stings. Long pants and shirts cover all skin areas. Protective equipment includes a face shield or thick hat. Closed shoes prevent foot stings completely. Our licensed experts use professional gear for every job. Safe solutions start with the right clothing choices.
Wasp spray selection makes the difference between success and danger. Choose products that shoot twenty feet or more. The insecticide must say “wasps and hornets” clearly. Never use regular bug spray for this job. Check the label for evening application instructions carefully. Our 5+ years experience shows which sprays work best. Same day availability means we bring the right tools. Your tool checklist should include a flashlight with red filter. Add a sturdy ladder and heavy garbage bags. Fast service from local trusted professionals costs less than injuries. Reliable full-service removal solutions for your property. 24/7 service means help when you need it. Affordable rates no hidden fees cover all equipment needed. Guaranteed enjoy 10% off all pest control services trusted includes safety gear usage.
Step by Step Safe Wasp Nest Removal Process
Removing wasp nest safely requires perfect timing and careful planning. We see Toronto homeowners make dangerous mistakes every summer. How to remove wasp nest becomes deadly without proper steps. Our licensed experts handle thousands of wasp nest removal cases yearly. Safe solutions protect your family from angry wasp attacks.
The wrong approach turns simple wasp ne how to iemergency room visits. We’ve rescued homeowners who tried unsafe removal methods. Fast service means we arrive before wasps become more aggressive. Local trusted professionals know exactly when Toronto wasps are most dangerous. Our 5+ years experience teaches us the safest removal timing.
Timing Your Wasp Nest Removal
Early morning hours before 7 AM work best for removing wasp nest operations. Wasps move slowly in cool Toronto morning temperatures. Evening after sunset reduces wasp activity dramatically. Hot midday hours make wasps extremely angry and defensive. We schedule same day availability during these safer time windows.
Never attempt wasp nest removal during warm afternoon hours. Wasps defend their homes most aggressively then. Cold weather slows down wasp reaction times significantly. 24/7 service means we handle emergency removals anytime. Rain and wind also reduce wasp activity levels. Perfect removal weather combines cool temperatures with light wind.
Application Technique and Safety Steps
Put on thick clothing and face protection first. Stand at least 15 feet away from the nest. Spray wasp killer directly into the nest opening. Saturate the entire nest structure with wasp spray completely. Never stand directly under the nest during spraying.
Retreat immediately after spraying the nest thoroughly. Watch for escaping wasps from a safe distance. Affordable rates no hidden fees cover all safety equipment costs. Wait 24 hours before checking the nest again. Guaranteed enjoy 10% off all pest control services trusted when you call professionals instead.
Post Removal Cleanup and Disposal
Check for any remaining wasp activity the next morning. Use a long stick to knock down the nest. Put the nest in a thick garbage bag immediately. Seal the bag tightly before throwing it away.
Clean up any dead wasps around the area. Wash your hands and tools with soap and water. We provide reliable and thorough cleanup services. Seal any holes where the nest was attached. This prevents new wasps from building there again.
Professional Wasp Removal Methods in Toronto
Professional wasp removal beats DIY methods every single time. Our licensed experts use advanced techniques that homeowners cannot access. Pest control service companies have specialized equipment for dangerous situations. We handle wasp extermination jobs that put families at risk. Local trusted professionals know Toronto’s wasp species best. Same day availability means we solve problems before they grow. Fast service keeps your family safe from aggressive swarms.
Safe solutions start with proper identification of wasp types. We use commercial grade products not sold in stores. 24/7 service covers weekend and holiday emergencies too. Our 5+ years experience shows in every successful removal. We provide professional solutions for standard homes in Toronto. Affordable rates no hidden fees means transparent pricing always. Guaranteed enjoy 10% off all pest control services trusted when you book today.
Commercial Grade Treatment Options
Professional wasp removal uses industrial strength products for complete elimination. We apply residual treatments that prevent future colony formation. Foam applications reach deep into wall cavities safely. Long-range sprayers keep our technicians away from danger. Wasp extermination requires products with extended killing power. Store-bought sprays only anger wasps without killing them. We use dust formulations that spread through entire colonies. Professional grade chemicals work faster than home remedies. Pest control service teams carry multiple treatment options. We choose the best method for each specific situation.
Specialized Equipment and ExpertiseDIY costs vs professional pricing might surprise you
Professional wasp removal teams wear full protective suits during treatments. We use telescoping poles to reach high nests safely. Industrial vacuums remove entire colonies without spreading them. Licensed experts know exactly how different wasp species behave. Thermal imaging cameras locate hidden nests inside walls. Wasp extermination requires knowing when wasps are most vulnerable. We time treatments for maximum effectiveness and safety. Professional ladders and lifts access dangerous locations securely. Pest control service professionals understand Toronto building codes too. Our equipment costs thousands more than DIY options.
Common Wasp Removal Mistakes to Avoid
Toronto homeowners make deadly dangerous methods mistakes with wasp nest removal. We see these fire hazards every summer in our work. People try crazy things like gasoline and matches on nests. This creates house fires that hurt families badly. Chemical misuse happens when people use wrong spray products. Garden hose water makes wasps attack in angry swarms. Timing errors mean people approach nests during busy day hours.
Our licensed experts fix these problems with safe solutions every day. We get calls after people try dangerous methods first. Fast service means we arrive before more mistakes happen. Same day availability helps when DIY goes wrong fast. People avoid stings when they call our local trusted team. Our 5+ years experience shows us every mistake possible. 24/7 service means help comes even after evening accidents. Wasp nest safety requires proper tools and training always. We provide expert services designed to keep you safe. Affordable rates no hidden fees beat hospital bills from wasp attacks. Guaranteed enjoy 10% off all pest control services trusted when you skip risky DIY attempts.
Toronto Wasp Removal Cost Comparison Guide
DIY costs vs professional pricing might surprise you in Toronto. DIY wasp removal runs about $30-50 for spray and gear. But hidden costs add up fast when things go wrong. Emergency room visits cost thousands if you get stung badly. Professional vs DIY becomes clear when you factor safety risks. Expert solutions for safely removing small nests. Affordable rates no hidden fees means you know exactly what you pay.
Value analysis shows professionals save money long-term in Toronto. DIY attempts often fail and wasp removal cost doubles with callbacks. We see homeowners try three times before calling us. Our fast service with 5+ years experience gets it right first time. Same day availability prevents nests from growing larger and costlier. Safe solutions from local trusted professionals protect your family’s health. 24/7 service handles emergencies when wasps threaten outdoor events. Guaranteed enjoy 10% off all pest control services trusted makes professional removal surprisingly affordable for Toronto families.
Preventing Future Wasp Nests Around Your Home
Wasp prevention starts with smart home maintenance every spring. Toronto homeowners can stop wasps before they build dangerous colonies. We see the same nesting site problems every year around the city. Cracks in siding become perfect wasp apartments. Loose roof tiles create hidden entrance points. Our licensed experts know exactly where wasps love to build. Fast service means we can seal problem areas before wasps arrive. Safe solutions protect your family without harsh chemicals.
Sealing and Maintenance Strategies
Block every possible nesting site before wasp season starts. Check your home’s exterior walls for tiny cracks and holes. Wasps squeeze through spaces smaller than your pinky finger. Seal gaps around windows, doors, and utility pipes with caulk. Replace broken screens on vents and attic openings immediately. Same day availability means we fix problems fast when you spot them. Our local trusted team has 5+ years experience finding sneaky entry points. Expert services for comprehensive home sealing. Don’t wait until you hear buzzing sounds inside walls.
Natural Deterrents and Traps
Fake wasp nests work because wasps hate territorial fights. Hang fake nests near porches, decks, and garden areas. Real wasps think another colony already claimed the territory. Plant mint, eucalyptus, and citronella around your property edges. These plants smell terrible to wasps but great to humans. Set up wasp traps near garbage cans and compost bins. 24/7 service means emergency help when prevention methods fail. Affordable rates no hidden fees cover all our prevention strategies. Guaranteed enjoy 10% off all pest control services trusted customers love our natural approach.
Frequently Asked Questions
Toronto homeowners ask us these questions every day about wasp nest removal. Our licensed experts have handled every type of wasp situation in the city. We get calls about dangerous nests in walls and attics. We also help with small paper wasp nests under porches. Our 5+ years experience helps us answer these tough questions. Fast service means we solve your wasp problems quickly and safely.
What are some ways to remove a wasp nest without using chemicals?
Soapy water works well for small wasp nests early in spring. Mix dish soap with water in a spray bottle. Spray the nest thoroughly at night when wasps are sleeping. The soap clogs their breathing holes and kills them safely. You can also use a shop vacuum to suck up wasps from the nest opening. Turn on the vacuum and place the hose near the nest entrance. Adult wasps get trapped inside the vacuum bag. Safe solutions like these work for tiny nests only. Local trusted professionals recommend these methods for golf ball sized nests maximum.
How do you take down a wasp’s nest safely in hard to reach locations?
Never attempt removing nests from high places or inside walls yourself. Professional pest control experts use special ladders and safety equipment. We wear full protective suits that cover every inch of skin. Insecticide application requires long-range spray equipment for distance. Hard to reach nests often belong to aggressive wasps like hornets. These social insects attack in groups when their nest gets disturbed. Same day availability means we handle dangerous nests immediately. 24/7 service covers emergency situations in Toronto homes.
Have you ever removed a wasp nest yourself? How did you do it?
We remove hundreds of wasp nests each year using professional methods. Small exposed nests can be handled with proper protective gear. Wait until evening when all worker wasps return to the nest. Wear thick clothing that covers your entire body completely. Use a long-range wasp spray from at least 20 feet away. Spray directly into the nest opening for 10 seconds straight. Retreat immediately and wait 24 hours before checking results. Pest control professionals never recommend DIY for large nests. Expert removal services with safety guaranteed.
How to remove wasp nest and let them leave without killing them?
Relocating live wasp colonies is extremely dangerous and rarely successful. Social wasps become highly aggressive when their nest gets moved. The queen and worker wasps will attack anything nearby. Beneficial insects like bees can sometimes be relocated safely. Wasps are different because they defend their nest violently. Traps can capture some wasps but won’t eliminate the colony. Moving nests requires special permits and training in most areas. Affordable rates no hidden fees cover humane removal when possible.
What’s the best way to get rid of a wasp nest?
Professional removal is always the safest and most effective method. Licensed technicians use commercial grade insecticides and protective equipment. We identify the wasp species before choosing treatment methods. Paper wasps need different approaches than yellowjackets or hornets. Nest size and location determine the removal strategy needed. Small nests might need one treatment while large ones need multiple visits. Guaranteed enjoy 10% off all pest control services trusted for first-time customers. Professional removal prevents stings and ensures complete nest elimination.
What are alternative methods for getting rid of wasp nests without gasoline?
Never use gasoline, fire, or explosives on wasp nests ever. These methods cause house fires and angry wasp swarms. Pesticide sprays designed for wasps work much better and safer. Diatomaceous earth powder kills wasps when they walk through it. Essential oil sprays with peppermint repel wasps from nesting areas. Fake wasp nests sometimes deter territorial species from building nearby. Insecticidal dust works well for ground nests and wall cavities. Professional treatments use eco-friendly pesticides that break down quickly.
Do wasp traps work for nest removal?
Wasp traps catch individual wasps but cannot eliminate entire colonies. Traps work best for reducing wasp numbers around patios. They help protect outdoor dining areas from foraging wasps. Yellow jacket traps use sweet baits to attract workers. Paper wasp traps need protein baits during summer months. Traps never replace professional nest treatment for serious problems. Nesting wasps keep producing new workers all season long. Professional pest control eliminates the source instead of just symptoms.
When is the best time to remove wasp nests in Toronto?
Early morning or late evening works best for wasp nest. Wasps are less active when temperatures drop below 60 degrees. Spring removal in April prevents nests from growing large. Toronto wasp season runs from May through October each year. Worker wasps emerge in late spring and peak in August. Nests become most dangerous during hot summer months ahead. Professional timing ensures all wasps are inside the nest. Cold weather makes wasps sluggish and less likely to attack.
